
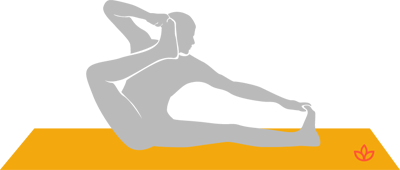
As a former and passionate runner, stretching is a must when preventing injuries and staying fit, especially if we’re talking about your knees, hamstring muscles, and the legs in general. Below you will find six yoga poses for hamstring muscles that will help improve your flexibility and allow you to continue practicing your passion for running more safely.
1. Baddha Konasana
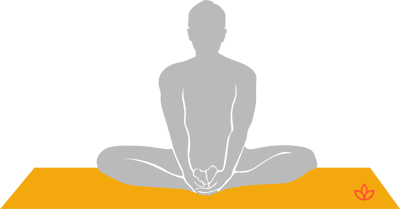
Baddha means caught, restrained. Kona means angle. Asana means posture. In this posture, sit on the floor, bring the heels near the perineum, catch the feet and widen the thighs until the knees touch the floor on either side.
How to:
- Sit on the floor with the legs stretched straight in front.
- Bend the knees and bring the feel closer to the trunk.
- Bring the soles and heels of the feet together and catching the feet near the toes, bring the heels near the perineum. The outer sides of both feet should rest on the floor, and the back of the heels should touch the perineum.
- Widen the thighs and lower the knees until they touch the floor. (for beginners let the knees hover until you improve flexibility)
- Interlock the fingers of the hands, grip the feet firmly, stretch he spine erect and gaze straight ahead at at the tip of the nose. (hold the pose as long as you can)
- Place the elbows on the thighs and press them down. Exhale, bend forward, rest the head, the the nose and lastly the chin on the floor. Hold this position if possible from half a minute to a minute with normal breathing.
- Inhale, raise the trunk from the floor and straighten the legs to relax.
Effects:
Butterfly pose relieves sciatic pain and prevents hernia. If practiced regularly, it relieves pain and heaviness in the testicles. For women it checks irregular menstrual periods and helps the ovaries to function properly. This pose is recommended to pregnant women as it’ll help with having much less pain during delivery. It is specially recommended for those suffering from urinary disorders as the pelvis, the abdomen and the back get a plentiful supply of blood and are stimulated.
2. Upavistha Konasana
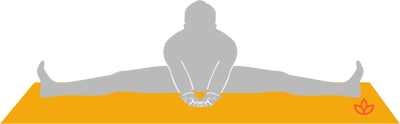
Upavistha means seated. Kona means angle. Asana means posture.
How to:
- Sit on the floor with the legs stretched straight in front.
- Move the legs sideways one by one and widen the distance between them as far as you can. Keep the legs extended throughout and see that the back of the entire legs rests on the floor.
- Catch the big toes between the respective thumbs and index and middle fingers, keep the spine erect and extend the ribs. Pull the diaphragm up and hold the pose for a few second with deep breaths.
- Exhale, clasp the feet with the hands and try to bend forward to rest the head and chest on the floor. (For beginners, extend the arms in front)
- Hold the left foot with both hands, exhale and rest the chin on the left knee. Inhale and repeat other side.
Effects:
The asana (posture) stretches the hamstrings and helps the blood to circulate properly in the pelvic region and keeps it healthy. It prevents the development of hernia of which it can cure mild cases and relieves sciatic pains. Since the posture controls and regularizes the menstrual flow and also stimulates the ovaries, it is very beneficial to women.
3. Jathara Parivartanasana
Jathara means the stomach, the belly. Parivartana means turning or rolling about, turning round.
How to:
- Lie flat on the back on the floor.
- Stretch out both arms sideways in line with the shoulders, so that the body resembles a cross.
- Exhale, raise both legs up and together, forming an L shape until they are perpendicular to the floor. They should remain poker stiff, so do not bend them at the knees.
- Exhale, and move both legs sideways down towards the floor to the left until the toes of the left foot almost touch the finger-tips of the outstretched left hand.
- Try and keep the back well on the floor.
- In the initial stages, the right shoulder will be lifted off the floor. To prevent this ask a friend to press it down, or catch hold of a heavy piece of furniture with the right hand when the legs are turned sideways to the left.
- Keep the knees tight throughout and move the abdomen to the right when the legs are lowered to your left. Repeat the other side and move the abdomen to the left when lowering the legs to the right.
- Hold the pose for at least 20 seconds.
Effects:
This asana is good for reducing excess fat. It tones and eradicates sluggishness of the liver, spleen and pancreas. It also cures gastritis and strengthens the intestines. By its regular practice all the abdominal organs are kept in trim. It helps to relieve sprains and catches in the lower back and the hip region.
4. Anantasana

Ananta is a name of Visnu and also of Visnu’s couch, the serpent Sesa. According to Hindu mythology, Visnu sleeps in the primeval ocean on his couch Sesa, the thousand-headed serpent. In his sleep a lotus grows from his navel. In that lotus is born the Creator Brahma who fashions the world. After the creation, Visnu awakens to reign in the highest heaven, Vaikuntha. The pose is found in the temple dedicated to Lord Ananta Padmanabha (padma=lotus: nabha=navel) of Trivandrum in South India.
How to:
- Lie flat on the back. Exhale, turn to the left and rest the body, keeping the side in contact with the floor.
- Raise the ahead, stretch the left arm beyond the head in line with the body, bend the left elbow, raise the forearm and rest the head on the left palm which should be placed above the ear.
- Bend the right knee and catch the right big toe with the right thumb and the fore and middle finders.
- Exhale, stretch the right arm and leg up vertically together. Hold the pose from 15 to 20 second with normal breathing.
- Bend the right knee and return resting on the side of the body. Roll over on the back and repeat the pose on the other side.
Effects:
The pelvic region benefits from this exercise and the hamstring muscles are properly toned. The pose also relieves backaches and prevents the development of hernia.
5. Supta Padangusthasana
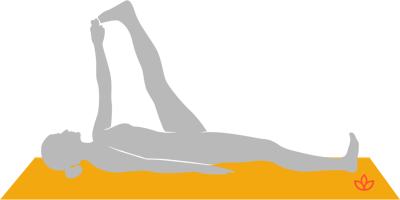
Supta means lying down. Pada is the foot. Anghusta means the big toe.
How to:
- Lie flat on the back, stretch both legs and keep the knees tight.
- Inhale, raise the left leg from the floor until it is perpendicular. Keep the right leg stretched fully on the floor and rest the right hand on the right thigh.
- Raise the left arm and catch the left big toe between the thumb and the fore and middle fingers.
- Exhale, raise the head and trunk from the floor, bend the left arm at the elbow and pull the left leg towards the head without bending it at the knee. Pull the leg down toward the face, lift the head and trunk up together and rest the chin on the left knee. Hold for 20 second, keeping the right leg fully stretched straight along the floor while breathing normally. (beginner’s skip this step)
- Inhale, move the head and trunk back to the floor and the left leg back to perpendicular. Repeat other side.
Effects:
The legs will develop properly by the practice of this asana. People suffering from sciatica and paralysis of the legs will derive great benefit from it. The blood is made to circulate in the legs and hips where the nerves are rejuvenated. The pose removes stiffness in the hip joints and prevent hernia.
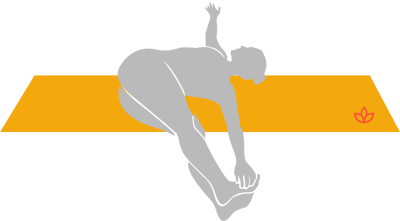
6. Akarna Dhanurasana
Karna means the ear. Dhanu means a bow. In this posture, the left foot is pulled up till the heel touches the ear as an archer pulls the bow-string, while the other hand hold s the right big toe, this leg lying straight on the floor. In the second movement the raised leg is straightened up until it is almost perpendicular, the big toe big toe being held throughout by the hand like an extended bow.
How to:
- Sit on the floor with the legs stretched straight in front.
- Hold the right big toe between the right thumb and the index and middle fingers. Similarly hold the left big toe. (beginners can use yoga belts for more ease)
- Exhale, bend the left elbow and lift the left foot up by bending the knee. Exhale and pull the left foot up until the heel is close to the left ear. at the same time draw the left arm back from the shoulder. Do not let go of the right big toe. Keep the right leg extended throughout and see that the back of the entire leg rests on the floor. Try your best not to bend the extended right leg at the knee.
- Hold this position from 15-20 seconds at least with normal breathing.
- (Beginners may skip this step or use yoga props such as belts.) Exhale and stretch the left leg up vertically. Draw the leg further back until it touches the left ear. Continue to grip the toes of both feet and fully extend both legs. It will take time to balance in this second movement.
- Exhale, bend the left leg and lower the left leg on the floor by keeping both legs stretched on the floor. Repeat other side.
Effects:
The practice of this posture makes the leg muscles very flexible. The abdominal muscles are contracted and this helps to move the bowels. Minor deformities in the hip joints are adjusted. The lower portion of the spine is exercised. The pose is full of grace and it should be practiced until it comes effortlessly and give the appearance of a trained archer discharging arrows from his bow.