Before trying any of the practices in this post, please listen to your body and consult with a qualified healthcare professional if you have an injury, medical condition, or structural difference that may affect your practice. This post is for educational purposes and is not a substitute for professional medical advice, diagnosis, or treatment.
1. Parvatasana (Seated Mountain)
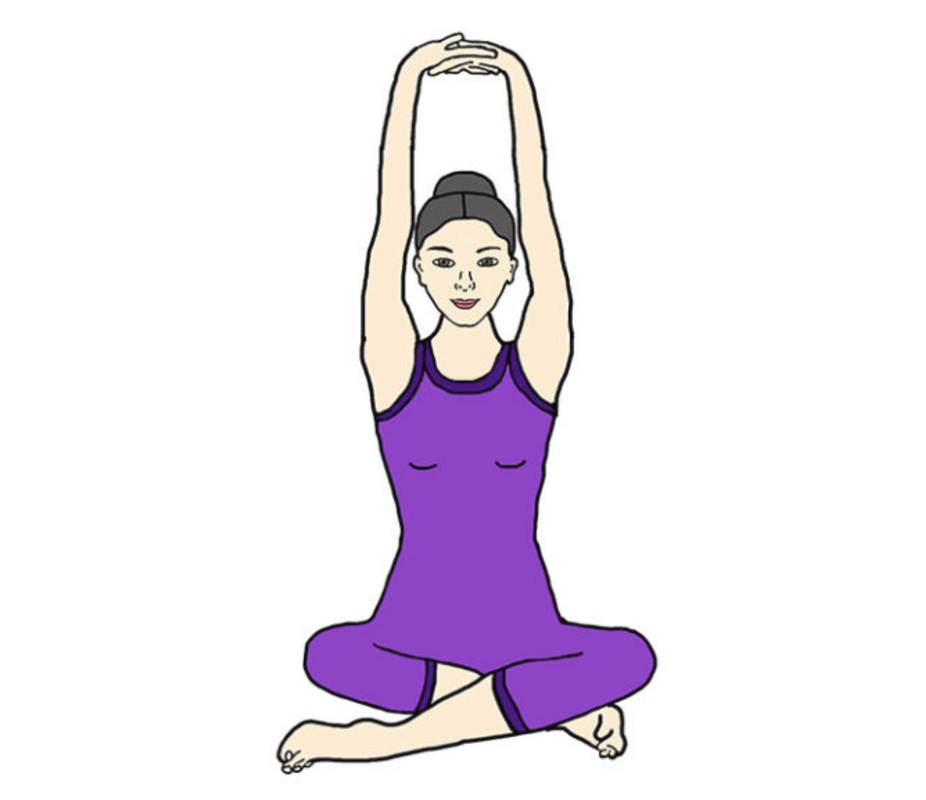
Parvatasana means a mountain. In this seated variation the arms are stretched over the head with the fingers interlocked. For advanced yogis, sit in Padmasana (Lotus Pose)
How to practice:
-Sit with your legs crossed or Lotus pose. Interlock the fingers, and stretch the hands vertically up over the head. Keep the head bent forward with the chin on the breast bone.
-Stretch the arms up from the latissimus dorsi (near the floating ribs at the back) and the shoulder-blades. The palms should face upwards.
-Hold the pose for a minute or two with deep and even breathing. Change the crossing of the legs and the interock of the fingers and repeat the pose, keeping the back erect.
2. Halasana (Plough)
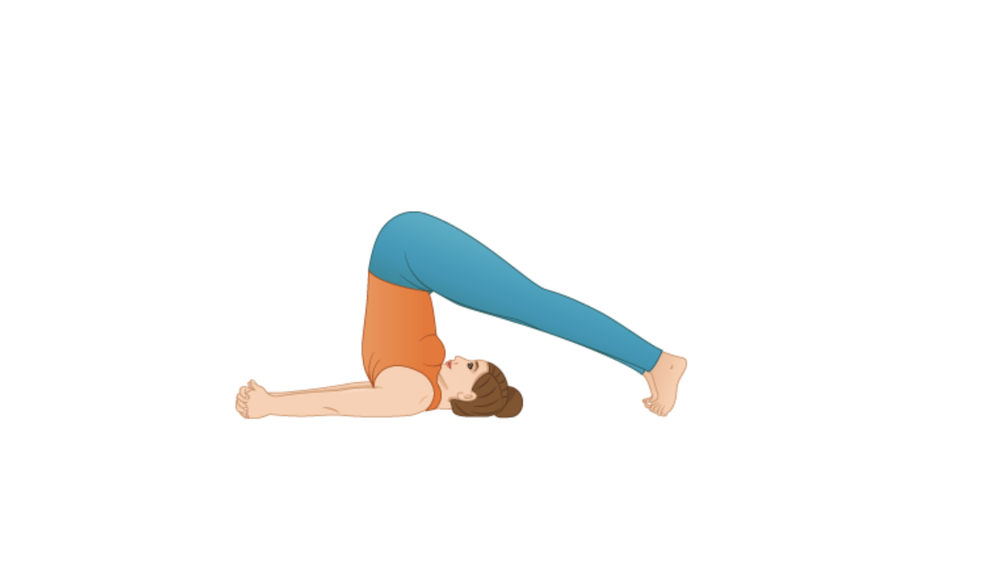
Hala means a plough, the shape of which this posture resembles, hence the name. It is a part of Sarvangasana I and a continuation thereof.
How to practice:
-Start in Salamba Sarvangasana (supported shoulder stand) or by simply lying flat on your back. Release the chinlock, lower the trunk slightly, moving the arms and legs over the head and resting the toes on the floor.
-Tighten the knees by pulling up the hamstring muscles at the back of the thighs and raise the trunk. Place the hands in the middle of the back and press it to keep the trunk perpendicular to the floor.
-Stretch the arms on the floor in the direction opposite to that of the legs. Interlock the fingers and turn the wrists so that the thumbs rest on the floor. Stretch the palms along with the fingers , tighten the arms at the elbow and pull the floor the shoulders.
-While interlocking fingers, it is advisable to change the interlock. Suppose that the right thumb touchers the floor first, maintain the position for a minute, Then release the grip and bring the left thumb first on the floor, follow the interlock, finger by finger, and stretch out the arms for the same length of time. THis will lead to harmonious development and elasticity of both the shoulders, elbows and wrists.
-In the beginning interlocking will be difficult. By gradual practice of the above mentioned positions, you will interlock the fingers easily. In the beginning it is also difficult to keep the toes firmly on the floor behind the head.
-Stay in this position with normal breathing for at least 3 minutes.
3. Adho Mukha Vrksasana (Downward Facing Tree or Handstand)
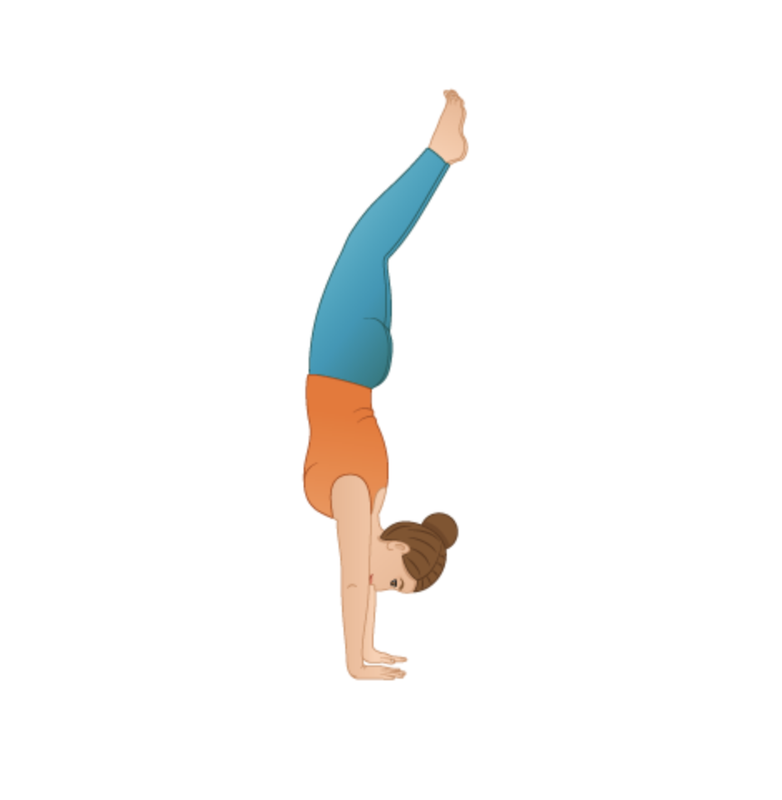
Adho Mukha means having teh face downwards. Vrksa means a tree. The pose is the full arm balance in modern gymnastics.
How to practice:
-Stand in Tadasana. Bend forward and place the palms ont h floor about a foot away from a wall. The distance between the palms should be the same as between the shoulders. Keep the arms fully stretched.
-Take the legs back and bend the knees. Exhale, swing the legs up against the wall and balance. IF the hands are kept far from the wall, the when the legs are supported by the wall the curvature of the spine will be great and will cause much strain. IT will also be difficult to balance if the hands are kept away from the wall. Stay in the pose for a minute with normal breathing.
-After learning to balance of the hands against the wall, take the feet away from the wall. Then try the pose in the middle of the room. Keep the legs fully stretched and the toes pointing up. Left the head as far up as you can.
The pose develops the body harmoniously. It strengthens the shoulders, arms and wrists and expands the chest fully.
4. Marichyasana (Sage twist pose)
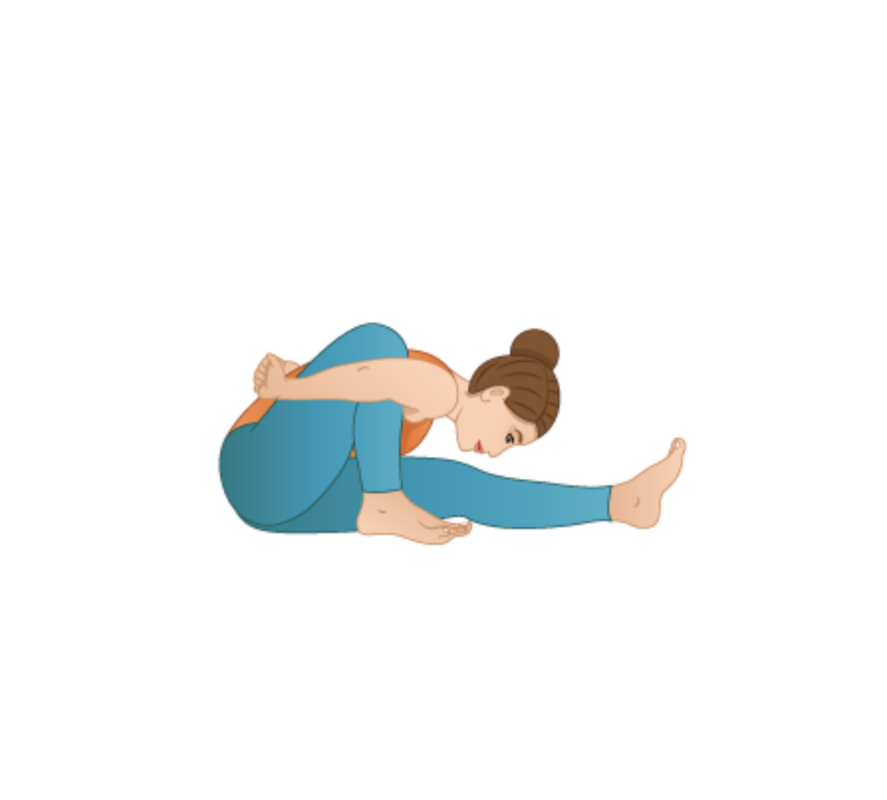
This asana is dedicated to the sage Marichi, son of the Creator, Brahma. Marichi was the grandfather of Surya (the Sun God).
How to practice:
-Sit on the floor with the legs stretched straight in front. Bend the left knee and place the sole and heel of the left foot flat on the floor. The shin of the left leg should be perpendicular to the floor and the calf should touch the thigh. Place the left heel near the perineum. The inner side of the left foot should touch the inner side of the outstretched right thigh.
-Stretch the left shoulder forward till the left armpit touches the perpendicular left shin. Turn the left arm round the left shin and thigh, bend the left elbow and throw the left forearm behind the back at the level of the waist. Then move the right hand behind the back and clasp the left hand with the right at the wrist or vice versa. If that is not possible then clasp the palms or the fingers.
-Turn the spine to the left, keeping the outstretched right leg straight. Remain in this position gazing at the outstretched right big toe and take a few deep breaths.
-Exhale, and bend forward. Rest the forehead, then the nose, next the lips and lastly the chin on the right knee. While in this position, keep both shoulders parallel to the floor and breathe normally. Stay in the pose for about 30 seconds and see that the back of the entire extended leg rests on the floor throughout.
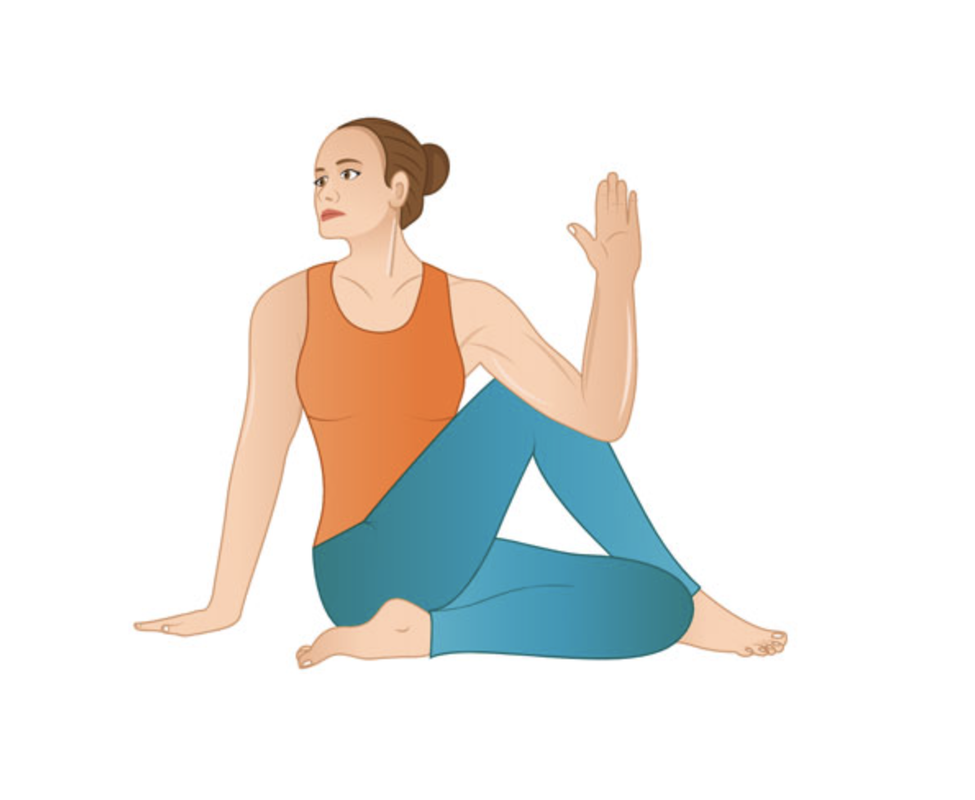
5. Ardha Matsyendrasana I (Half Lord of the Fishes pose)
This story makes me smile. Ardha means half. In the Hatha Yoga Pradipika, Matsyendra is mentioned as one of the founders of Hatha Vidya. It is related that once Lord Siva went to a lonely island and explained to his consort Parvati the mysteries of Yoga. A fish near the shore heard everything with concentration and remained motionless while listening. Siva, realising that the fish had learnt Yoga, sprinkled water upon it, and immediately the fish gained divine form an became Matsyendra (Lord of the Fishes) and thereafter spread the knowledge of Yoga. Paripurna Matsyendrasana, where the spine is given the maximum lateral twist, is dedicated to Matsyendra. Ardha Matsyendrasana is a milder version of that asana.
How to practice:
-Sit on the floor, with the legs stretched straight in front. Bend the left knee and join the thigh and calf; raise the seat from the floor, place the left foot under the buttocks and sit on the left foot so that the left heel rests under the left buttock. The foot used as the seat should be kept horizontal on the floor, the outer side of the ankle and the little toe of the foot resting on the ground. If the foot is not so placed, it will be impossible to sit on it. Balance securely in this position.
-Then bend the right knee and lifting the right leg from the floor, place it by the outer side of the left thigh so that the outer side of the right ankle toucher the outer side of the left thigh on the floor. Balance in this position, keeping the right shin perpendicular to the floor,
-Turn the trunk 90 degrees to the right until the left armpit touches the outer side of the right thigh. Bring the arpit over the right knee. Exhale, stretch the left arm from the shoulder and twist it round the right knee. Bend the left elbow and move the left wrist to the back of the waist.
-The left arm should lock the bent right knee tightly and there should be no space between the left armpit and the bent right knee. To achieve this, exhale and move the trunk forward. Stay in this position and take 2 breaths.
-Exhale deeply and swing back the right arm from the shoulder, bend the right elbow, move the right hand behind the waist and either clasp it with the left hand or vice versa. At first you will be able to catch a finger or two. With practice it will be possible to catch the palms and then the wrists behind the back.
-The neck may be turned to the left and the gaze directed over the left shoulder, or to the right, and the gaze fixed at the centre of the eyebrows. The spinal twist will be greater if the neck is turned to the left than when to the right.
-With practice the pose can be held from half a minute to a minute with normal breathing. (Repeat the pose from the other side)
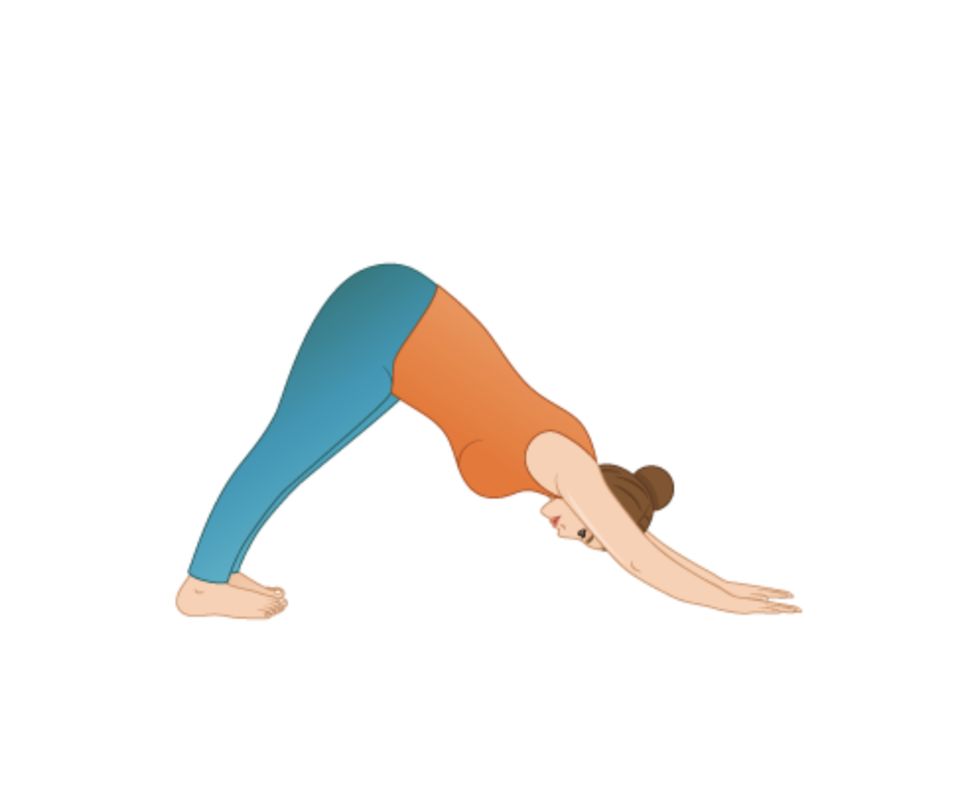
6. Adhomukha Svanasana (Downward Facing Dog)
Adho Mukha means having the face downwards. Svana means a dog. The pose resembles a dog stretching itself with head and forelegs down and the hind legs up, hence the name.
How to practice:
-Lie full length on the floor on the stomach, face downwards. THe feet should be kept one foot apart. Rest the palms by the side of the chest, the fingers straight and pointing in the direction of the head.
-Exhale and raise the trunk from the floor. Straighten the arms, move the head inwards towards the feet and place the crown of the head on the floor, keeping the elbows straight and extending the back.
-Keep the legs stiff and do not bend the knees but press the heels down. The heels and soles of the feet should rest completely on the floor, while the feet should be parallel to each other, the toes pointing straight ahead.
-Stay in the pose for about a minute with deep breathing. Then with an exhalation lift the head off the floor, stretch the trunk forward and lower the body gently to the floor and relax.
When exhausted, a longer stay in this pos removes fatigue and brings back the lost energy. The pose is especially good for runners who get tired after a hard race. Sprinters will develop speed and lightness in the legs. The pose relieves pain and stiffness in the heels and helps to soften calcaneal spurts. It strengthens the ankles and makes the legs shapely. The practice of this asana helps to eradicate stiffness in the region of the shoulder-blades, and arthritis of the shoulder joints is relieved. The abdominal muscles are drawn towards the spine and strengthened. As the diaphragm is lifted to the chest cavity the rate of the heart beat is slowed down.
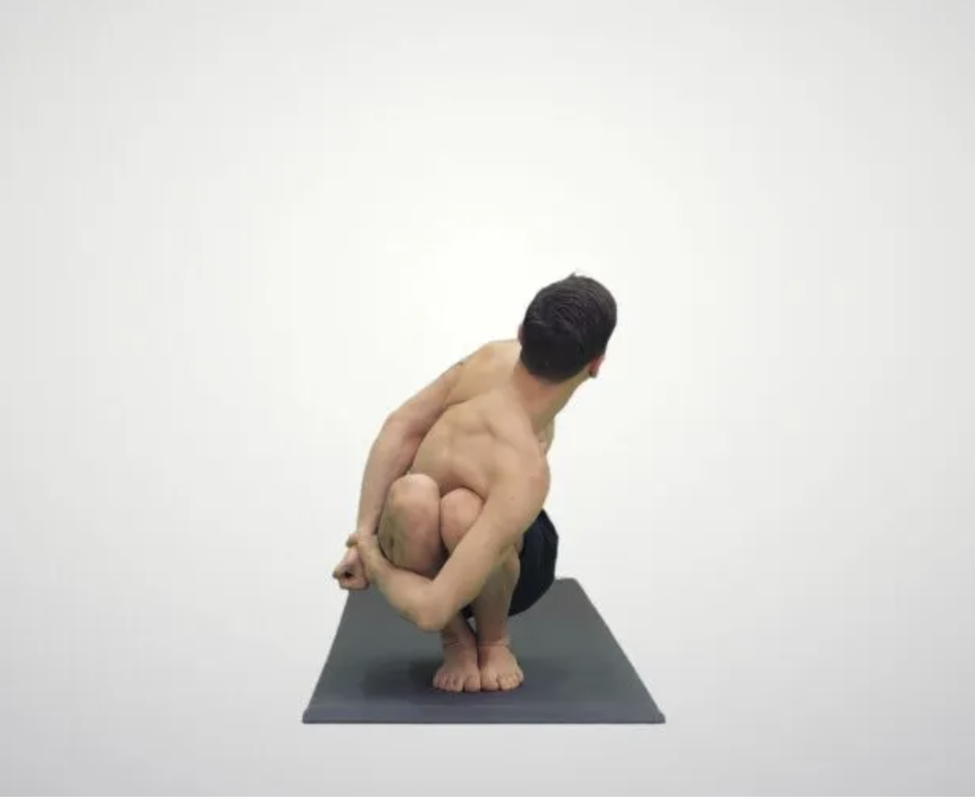
7. Passasana (noose pose)
Pasa means a noose or cord. In this posture, squat on the floor, turn the trunk about 90 degrees to one side, twist one arm round both the thighs and turning the other arm from the shoulder clasp hands behind the back. The arms are used as a noose to hold the trunk to the legs, hence the name.
How to practice:
Squat on the floor with the soles and heels completely on the floor. Keep the knees and feet together, raise the seat from the floor and balance.
-Ater securing the balance, twist the trunk aout 90 degrees to the right until the left armpit is beyond the outer side of the right thigh near the right knee. To achieve the maximum twist, flex the left knee about and inch forward.
-Exhale, extend the left arm from the shoulder, eave no space between the left armpit and the right thigh, turn the left arm round the right thigh and, bending the left elbow toward the left leg, bring the left hand near the left hip. Take a breath.
-Exhale, twist the right arm from the shoulder behind the back, nemd the right elbow and hook the fingers behind the back near the left hip. Gradually clasp the palms and when this becomes easy, clasp the wrists.
-Tighten the calk muscles to maintain the balance, twist the spine as far to the right as you can and stay in the pose from 30 to 60 seconds with normal breathing. Turn the neck and gaze over either shoulder.
-Release the hand clasp and repeat the pose on the other side. Here, twist the trunk to the left, bring the right arm round the left thigh, bend the right elbow and bring the right hand near the right hip. Then with an exhalation turn the left arm back from the shoulder, bend the left elbow and clasp the right hand with the left behind the back near the right hip.